Pages

Wednesday, October 30, 2013

Dia de los Muertos mask project

In recovery, our addictions can be viewed as masks.  We use our addictive substance or person to mask our feelings - even from ourselves.  In this creative activity, I asked everyone to draw on a mask.  With Day of the Dead approaching, they were invited to illustrate the outside of the mask Dia de los Muertos style - or simply as how they believe they portray themselves to the world.

Then, on the inside of the mask, they were asked to draw or write what they don't want others to see - whether feelings or character defects.  It was a powerful assignment, for me, too.

Supplies:

Here is how a couple of the masks turned out:


The above mask actually used blank white masks from here, but the consensus of our group was that the matte texture of the masks listed above and the shape were both preferable to these shiny texture, full-face masks.


Here is a mask made with the blank masks listed under supplies.

Whether you celebrate the Day of the Dead or not, I hope you have a meaningful experience playing with masks.

Saturday, April 13, 2013

Step 8: Broken Plate Mosaic Mirrors

Step 8: Made a list of all persons we had harmed and became willing to make amends to them all.

In this creative project, like in this step, we sort through the damage of our past to assess where we have been at fault.  We don't actually make any amends in this step, but we look at what amends may need to be made.  This process helps us to gain a clearer image of ourselves, thus my inclusion of the mirror element to this creative project.  I chose attractive or meaningful ceramics to break, which also reflects my love for the people who have made it onto my amends list.

Supplies needed:


1.  Lay rag or bag out on hard surface (you may want to use a piece of plywood if you don't have a hard surface you are willing to potential leave marks on).


2.  Place your ceramic plate, face down on the rag or in the bag.  Wrap the plate in the rag.

3.  Put your goggles on.

4.  Hammer the center of the plate.

5.  Unfold the rag to view your shards.  


6.  If the pieces are still too large, you can hammer them again, such as with this cup:


The first crack at it, didn't break it into small enough pieces, so I repositioned the pieces and took a second crack at it:


For the smaller items, I felt through the fabric of the bag to find the best place to hammer.  For plates, I found the rims along the bottom to be the most effective target.


7.  To create even smaller pieces or more specific shapes, you may prefer to use the tile nippers.  The tile nipper can be used to either break a large piece into smaller pieces or to nibble the edges of a small piece to create a specific shape.


8. Select your favorite shards for use in your mosaic.


9.  Lay your shards of ceramic on the beveled edge of the mirror tile.  Use the tile nippers to shape them to fit together as best you can.


10. Once you have your pieces in place, lift one at a time and apply Weld-bond glue to affix in place.  Apply glue to both the ceramic piece and the mirror and press together.


11.  Allow to dry for one hour.

12.  Throw away the rag or bag you used to collect the shards of ceramic.  Given the potential for cutting yourself with these shards, I do not recommend reusing these items.

Here is what my final mirror mosaic looked like:


This art project was very powerful for me and led to a dream where I made an amends that I was not able to make to the live person whom I'd harmed.  The dream was very healing.  Just like the harms I have done have harmed others, they always also harm myself.  

Although I was nervous, breaking the pretty ceramics, I'm glad that I was able to turn the damage into something beautiful and in the process, develop a clearer reflection of myself - just like in practicing the 8th step!

Thursday, April 11, 2013

Step 2: Filling the God-Sized Hole

Step 2: Came to believe that a Power greater than ourselves could restore us to sanity.

In recovery, there is often reference to what is called a "God-sized hole."  What is being referred to is the space inside us where we feel our emptiness and loneliness most acutely.  This is the space that we often attempt to fill up with our addiction of choice - whether that is through alcohol, drugs, food, sex, gambling, or whatever compulsive behavior it is that we find most troubling.  It is referred to as a "God-sized Hole," because none of those other things can fill that void.  The only thing that can fill that void is our Higher Power.

For this project, I asked the group to use a box as a representation of their "God-sized Hole" and to fill it with representations of their Higher Power and/or of their recovery. This activity was inspired by artwork that can be found in a multitude of cultures - some refer to these boxes as nicho, retablo, or in secular culture, assemblage.

Alternatively, I invited the group to create more of a diorama or ex-voto, depicting a scene that highlights a miracle they have received as part of their recovery.

Supplies:

  • cigar boxes (or similar)
  • gold spray paint (or paint of another color if you prefer) and old newspaper or another protective surface for painting onto
  • found objects from nature, spiritual objects, recovery stickers or any other items that can be used to represent your Higher Power


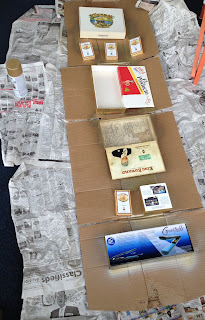
Some of the boxes were in better condition than others.  Some I was able to provide to the group without modifying them.  But for the large number of boxes that contained text or images that did not seem in alignment with the project.  I spray-painted these boxes with gold spray paint.I picked up a bunch of old cigar boxes and other boxes that I thought could serve well as a medium from which to create a "God-sized Hole."

Some of the boxes were in better condition than others.  Some I was able to provide to the group without modifying them.  But a large number of boxes contained text or images that did not seem in alignment with the project.  I spray-painted these boxes with gold spray paint.

For my purposes, I used Rustoleum gold, as that is the spray paint I had on hand.  But any type of paint will do, so long as you paint enough layers to cover the underlying text and/or images.

I recommend examining all sides of the boxes, including the insides. Some of my boxes only needed paint on 5 sides, but several had print and images inside the box, so I painted their insides as well.

Here is how they looked after their initial coats of paint.  The box in the very front needed a little extra paint where you can see the underlying black showing through.  Alternatively, you can paint a primer white over the boxes before using the colored paint, but I just doubled up on the gold paint in these areas.

Then, I provided a variety of "God-oriented" artifacts that could be used to decorate the interior of the box.  I tried to be as inclusive of as many religious affiliations as possible, as well as include artifacts that would be appreciated by both the atheists and pagans in our group.  The inexpensive objects I provided included:


One could use whatever symbolism they choose that feels like the best reflection of their Higher Power.  Your representation may be something entirely different than anything on this list.

Here is the God-Sized Hole box I ended up creating.  The butterfly plays the central role of the box, as I have relied heavily on the butterfly's representation of metamorphosis and change to remind me of the better things to come as I continue in my recovery.  The beads in the bottom of the box, below the butterfly are prayer beads I picked up while traveling in Egypt.

On the inside of the box door, I have Kwan-Yin to remind me to be compassionate with both myself and others.  And the labyrinth around and leading to Kwan-Yin, reminds me to meditate and maintain conscious contact with my Higher Power.


I put an abundance of butterflies on the front of the door to the box to represent the many miracles I have seen manifested in my life through my practice of the 12 steps in various programs.


What will you use to fill up your God-sized hole?

Friday, March 29, 2013

Step 9: Amends

Step 9: Made direct amends to such people whenever possible, except when to do so would injure them or others.

I've worked several 9th steps in various programs.  Out of all of the different ways of making amends, I find the face-to-face amends to be the most profound and healing.  They are super scary to do, but the outcomes have without a doubt been worth acting through those fears.

In the process of preparing for my face-to-face amends, I've always written a script with my sponsor before meeting live with the person whom I owe the amends to.  Usually, this has simply been a written script in the following format:


  • When __________  [I am specific about the time period, so the person knows exactly what I am referring to]
  • I ________________[action I did that harmed this person].
  • Since then, I've come to realize that I ______________ [state what exactly I am responsible for].
  • I'm sorry I did that.
  • Faced with this today, my intention is to ___________ [how do I plan to behave differently?].


A lot of emotions tend to arise in this process.  I always arrive early to make my amends, so I am able to center myself before the person arrives whom I'm making the amends to.  It can be especially challenging to sit with uncomfortable feelings while I am waiting.

One creative process that has been helpful to me is to write out the dialogue like a comic and pay special attention to the facial expressions.  Doing any kind of art that allows me to express my emotions is super helpful in allowing me to tolerate the emotion.  Oftentimes, if I'm noticing an urge to run away from my feelings and check out with any addictive substance or behavior, if I write or draw that emotion in whatever way I can, I am much more capable of tolerating the feeling, at least for the duration of the writing or creative activity.  Here is an example of a script I drew out while waiting to make one of my amends:


What feelings come up for you when you think of making amends?  What will you draw or doodle to express those emotions?

Thursday, March 28, 2013

Step 11: Labyrinth Walks

Sought through prayer and meditation to improve our conscious contact with God as we understood God, praying only for knowledge of God's will for us and the power to carry that out.

One of my favorite ways to practice the 11th step is visiting labyrinths and performing a walking meditation.  Public labyrinths can be found all over the world.  You can use this World-Wide Labyrinth Locator to find the labyrinth closest to you.


Labyrinths are an ancient symbol, representing wholeness.  They are used as spiritual tools that aid in meditation and aid in our becoming mindful of our spiritual path in life.  Labyrinths are circular; they spiral - in a meandering, but purposeful path - into their center.  They are metaphors for life's journey.  Walking the path of the labyrinth can be seen as a journey into the center of your deepest self and then back out into the world with increased understanding of who you are and where you are going.  In this fashion, we are able to get out of our egos to the sacred place, "That Which is Within."Although labyrinths appear similar to mazes, there are no wrong turns nor dead ends.

I usually go and walk labyrinths as a solitary activity, but you could also make a field trip out of it for a small group.


Which labyrinth is closest to you?

Saturday, March 23, 2013

Step 10: Binding a 10th Step Journal

Step 10:  Continued to take personal inventory and when we were wrong promptly admitted it.

For step 10, our creative project was binding a 10th step journal.

Supplies needed:


AND something to create holes to bind the twine through:
  • awl
  • hole punch < this one creates a smaller hole, but a standard-sized hole punch will do
  • hammer and a nail
Optional cover decorations:
  • markers
  • collage supplies
  • stickers
  • stencils


To start, I provided a print-out, compiling 13 different formats of 10th step inventories that I've collected over the years. For one of them, I added shiny star stickers simply to make completing that inventory more fun.


For the creative aspect of this activity, our time in the group was spent binding the covers.  The members of the group then went home to fill out their 10th steps on their own.

1.  We passed around the packet of card stock, so each person could choose which color they wanted for the cover.

2. We then folded the covers and ran the flat edge of the bone folder along the fold to sharpen the crease:

3. Next we placed binder clips on the top and bottom edges of our "books."

4. We then used a ruler and the pointed edge of the bone folder to draw a line where we wanted our front covers to open.  If you are not using a bone folder, you can skip this step and simply use a pencil and lightly mark the book where you'll want the holes to be (see the next step).


5. Next we measured where we wanted our holes to go.  These holes can be marked with the awl (the awl can then be used to create the hole) or by using a pencil.  We placed one marking one inch from the top; the second marking was one inch from the bottom; and the third marking was in the middle of the book (at 4.25" mark of our 8.5" booklets).


6. Then we punched our holes.  The hole punch I purchased had a marking on it, which made it easier to define exactly where the hole would appear.


7. Next we measured out our binding thread - four lengths of the edge of the book.


8. Then we thread the binding twine through the books.


For this process, we used binding instructions by J. Munkatchy that I made just a couple of modifications to:

Our holes were large enough that with the waxed binder's twine, we did not need to use needles.  By the time the twine made it's third cycle through some of the holes, we did sometimes need to use a pen to push the thread all the way through:


9. Like in the instructions, we finished the binding off with a knot:


10. Finally, we used markers to decorate our covers.  I kept mine pretty simple.


Completed 10th step booklets, just as the one pictured above, are available in my Etsy store.  Or have fun creating your own!

Tuesday, March 19, 2013

Step 6: Letting Go Rituals


Step 6:  Were entirely ready to have God remove all these defects of character.

As I've said in prior posts, I prefer to think of my character "defects" more like "character defenses."  I picked up these traits in order to survive stressful and/or traumatic experiences.  I have simply outgrown their purpose and found newer and better tools to use.

The 6th step is about our readiness to have these character defenses lifted.  We are not yet actually asking for them to be removed, simply examining our willingness.

Generally speaking, I recommend my sponsees review their fourth steps to reveal their character defects.  But for the purposes of this group project, I brought a list of possible character defects with me and simply asked the group to select 5 of the defects to examine through this exercise.

Here is the list from which they chose their defects:


This list has been floating around 12-step rooms for over 50 years.  The original author is unknown. But the on-line version where I downloaded this from can be found here.

I like that this list provides not only the character flaws, but also corresponding character assets.  I believe it is important to always keep a balanced perspective, instead of focusing 100% on the negative.

The first two rituals I will be describing were inspired by exercises in Stephanie S. Covington PhD's book A Woman's Way through the Twelve Steps.  Her Step Six exercises had a profound impact on me and on my recovery.  In fact, her providing these rituals helped to expand my definition of what it means to "work the steps."  It was this thinking-outside-the-box that eventually led to my exploration of art therapy as a means of working all 12 steps.  I've made some minor changes to her 6th step rituals, as follows.

Ritual #1:  Letting the Leaves Fall Where They May

Supplies needed:

  • leaves from a beloved plant
  • pen
  • elevated place from which to drop the leaves (i.e. second story window, balcony, deck, roof)


This is my beloved plant. We have had a very special relationship over the years.  This plant has been with me through a divorce, through the death of one of my dearest cats, through remarriage and the adoption of my current cats.  I've used this plant for multiple sixth step rituals, as I will describe below.


I always choose leaves that have already turned yellow, out of compassion for my dear plant.  But any leaves will serve the purpose.  As all leaves are quickly biodegradable.

For the ritual, we simply wrote a single character defect on each leaf.


Then, standing in an elevated place, we released one leaf at a time, to fall where it may.  It is always interesting to me to notice which defects are harder to let go of than the others.

Ritual #2:  Stones in the Water

Supplies needed:

  • stones
  • sharpie marker - either black if the stones are light colored or silver if the stones are dark colored.  Oil-based paint pens take longer to dry, but can appear more dramatic against the stone.
  • a body of water into which the stones can be thrown (i.e. lake, river, ocean, pond, creek)


For this ritual, we wrote a single character defect on each stone.


Then, standing along a body of water (safely away from other people or animals), we threw the stones into the water - one at a time.  Again, I always find it interesting to notice which stones I'm not ready to throw in and hang onto until the end of the ritual.

Ritual #3:  The Writing in the Sand

Supplies needed:

  • stick or other object to write in the sand with
  • body of water where waves lap safely onto the shore (not recommended in areas prone to rogue waves)


This is a ritual that I have only performed on my own, not in the group setting.  However, it could also be done with a group.

Find an area of the sand that is wet, where the waves still seem active.  Using your stick, write your character defect in the sand near the water's edge.  And wait.


This ritual is more close to reality in that you must wait for the defect to be lifted (or in this case, washed away).  It happens in Higher Power's time (and the ocean's time), not in our time.  There were times I barely finished writing the word before it got washed away (sometimes way before I was ready to let it go).  Other times, I had to wait several minutes before the defect got washed away.

If you're self-conscious, you can look up the tide schedule.  For highly populated beaches, you may want to choose to do this activity when the tide is coming in.  This provides a greater confidence that you won't have to wait hours for the waves to wash your defect away.

What character defects are you ready to have lifted?